Category: Technically Light

  • Container exec: Executing Commands in a running Container

    Container exec: Executing Commands in a running Container

    We recently introduced the levv exec command as part of our ongoing effort to simplify running containers in production. This command is particularly valuable for inspecting and debugging running containers. In this tutorial, we’ll delve into common use cases for the exec command and highlight best practices to follow and anti-patterns to avoid.

    Note: This tutorial examples use the levv exec command, but the same applies to docker exec.

    Using the levv exec Command

    Demonstration of the container exec command with levv exec

    Executing a Command in a running Container

    Executing a command in a running container is straightforward:

    Example of executing a command in a container

    Alternatively, you can also allocate a pseudo-tty using the --tty or -t option. This allows you to see the formatted output as you would if you were directly inside the container, rather than just receiving the output as plain text.

    Example of executing a command in a container using the -t/--tty option

    Executing a Command in the Background

    If you want to execute a long-running command in your container (watch out for anti-patterns), you can do so by using the -d/--detach option.

    $ levv exec -d my-svc curl <https://mirror.accum.se/mirror/wikimedia.org/dumps/>

    This will execute the command in your container without blocking your active terminal window.

    Running an Interactive Shell in a Container

    Sometimes, you may need a more hands-on approach to interact with your container. You can start an interactive shell by using the -i/--interactive option.

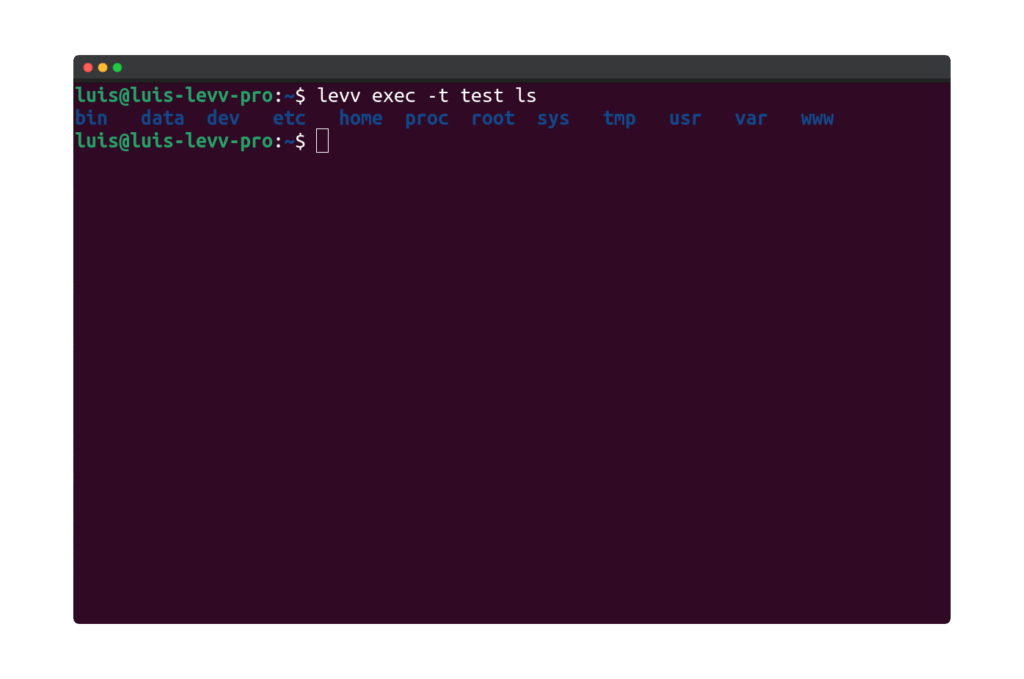
    $ levv exec -it my-service sh
    / # ls
    bin   data  dev   etc   home  proc  root  sys   tmp   usr   var   www
    / # echo "Running in a shell inside my container"
    

    This opens a shell in the specified container, allowing you to execute multiple commands interactively.

    You’ll notice we also used the -t/--tty option. When using -i/--interactive, we always allocate a pseudo terminal. It will work without it but the interactivity will be less intuitive (go ahead and try it!).


    Anti-Patterns

    The exec command is powerful and practical as it makes it easy to interact with your containers. However, it needs to be used wisely or it might make you lose key benefits of containers like reproducibility.

    Here we present the main exec anti-patterns.

    Directly modifying Application State

    One of the main advantage of containers is their reproducibility and predictability. When using exec to change an application configuration file or source code, we effectively lose those advantages. We expose ourselves to unplanned behavior and make it harder to debug in case of issue.

    This is sometimes acceptable for development or staging applications to speed up the development cycle, but it should never be done in a production application.

    Executing long-running Processes

    Using exec to execute long processes is a major anti-pattern, as it can lead to resource contention and negatively impact your main application. For instance, instead of running a database dump using exec, you should use a shared volume and a separate container.

    The same applies here: tolerated in dev/staging, never in production.

    Relying on exec in your Production Workloads

    You probably understood this from the previous anti-patterns: do not rely on exec for your production workloads.

    Over-reliance on the exec command for making changes (like hot-fixes or worse changes in application state) in production environments can lead to unexpected behavior and challenges in maintaining consistency across your containers. You will lose de facto the scalability and predictability offered by containers.


    Best Practices

    Now that you know what to avoid, in this section we cover how to make the best use of exec.

    But first, let’s examine security and the concept of immutability.

    exec and Security

    While the exec command is handy, it poses security risks. An attacker could exploit the command to execute malicious code within your container.

    Another category of security risk is that you could inadvertently expose sensitive data in your output when executing commands in your container.

    exec and Immutability

    Immutability characterizes systems or components that cannot be modified after their creation. For containers, this means that instead of modifying it, we build a new image and re-deploy it entirely.

    When working with containers in production, immutability is a good practice as it comes with operational benefits:

    • no configuration drift
    • change history
    • predictability

    and security benefits:

    • easy auditing
    • reduced attack surface
    • integrity

    Understanding the security and operational implications of using exec allows for more mature usage of the command.

    On to the best practices:

    Best Practice 1 : Use Specific Commands

    Execute specific commands when interacting with your containers instead of opening interactive shells by default. It minimizes risk and ensures clarity in your needs when interacting with your container.

    Best Practice 2 : Make Your Production Containers Immutable

    Containers are not immutable by default. You need to actually make them so. Once your application is ready for production, you can update your Dockerfile to make your image immutable:

    • Don’t run as root: use the USER instruction
    • Remove shell access by deleting all binaries: RUN rm -rf /bin/*

    You can also go one-step further by making your container filesystem read-only. This does not happen in the Dockerfile definition but at run time with the --read-only flag of docker run or with by setting read-only: true in your compose configuration.

    Note: At the time of writing, levv does not yet support the read-only keyword.

    If you make your filesystem read-only you will need to mount volumes at the path where your application needs to write under normal conditions.


    With this article, we covered example use cases of the exec command, some anti-patterns to avoid when working with exec and security and operation best practices.

  • How to deploy Odoo on levv cloud

    How to deploy Odoo on levv cloud

    Odoo is the world leading Open-Source ERP and CRM system, made in Belgium 😎

    In this tutorial, I will show you how to deploy an instance of Odoo 17 on levv cloud, the lightweight and eco-responsible cloud platform. Odoo uses PostgreSQL to store it’s data, so we will also deploy a PostgreSQL service backed by a persistent volume.

    Let’s dive in!

    Prerequisites to deploy Odoo on levv cloud

    First of all, make sure you have the latest version of the levv CLI installed and available in your $PATH. You can download and install the levv CLI here.

    If you don’t have one already, you can create an account on levv cloud, and authenticate using the levv auth login command.

    You will also be prompted to create a default project, which we can use to deploy our Odoo application (ours is simply named "odoo").

    Dockerizing Odoo

    Levv cloud services are based on containers, which are lightweight and portable units of software.

    For this example, we will simply use the official Odoo 17 image from DockerHub.

    Creating persistent storage

    By default, container data is lost after a crash or restart. To persist Odoo’s PostgreSQL database, we will create a persistent volume.

    Run the following command to create a volume of 10Gb inside your levv project.

    $ levv volumes create --size 10 odoo-db-data

    Volumes can also be defined inside the compose file. If the specified volume does not exist yet, levv will create it for you.

    Deploying the Odoo application

    To deploy containers, our personal favorite is the compose format because of it’s simplicity and ease of use.

    Levv cloud uses a compose-compliant specification very similar to Docker Compose to define it’s components, so if you are familiar with Docker you should find your way around pretty quickly.

    Let’s create the following YAML file and save it as odoo-levv.yaml.

    services:
      web:
        image: odoo:17.0
        ports:
          - "80:8069"
        labels:
          io.levv.public: true
          io.levv.size: mini
    
      db:
        image: postgres:15
        ports:
          - "5432:5432"
        environment:
          - POSTGRES_DB=postgres
          - POSTGRES_PASSWORD=odoo
          - POSTGRES_USER=odoo
        volumes:
          - odoo-db-data:/var/lib/postgresql/data
    
    volumes:
      odoo-db-data:
    

    This is the simplest, albeit not secure, way to deploy Odoo, so be careful before deploying in production.

    Note: when using the ports key, there are two key differences compared to running your compose file on your local machine:

    1. By default, and for security reasons, services are not reachable by other services at all. If you want another service within the same service to access it, you need to define the ports key.
    2. Using the ports key does not make your service available to the outside world. You need to use a label for that, as explained in the section below.

    Next, we will deploy our compose file to levv cloud :

    $ levv apply -f odoo-levv.yaml

    Once our services have been deployed, we will see the following output in the terminal:

    No project name has been specified, your default project will be used (odoo).
    Getting project volumes    successful
    Applying specification    successful
    
    SERVICE    PROJECT  REPLICAS  SIZE  PUBLIC URL                                STATUS    
    db         odoo     1/1       nano  <none>                                    DEPLOYED  
    web        odoo     1/1       mini  https://web-odoo-f0b0.svc.levv.io         DEPLOYED  
    

    For more information about the levv compose specification, click here.

    Exposing our application to the internet

    By default, services deployed on levv cloud are not publicly accessible.

    To expose our Odoo application to the internet, we added the io.levv.public label to the webservice in the compose file. As you can notice, the web service does have a public URL, while the database db service does not.

    By default, our web service will be served using HTTPS, using automatically generated SSL certificates from Let’s Encrypt.

    Note: levv takes care of SSL termination. So even if you expose port 80 on the container, the service will be accessible on port 443 via it’s public URL.

    We can also link our service to a custom domain name, using the domainname attribute in the compose file.

    For example:

    service:
      web:    
        labels:
          io.levv.public: "true"
        domainname: odoo.mydomain.be

    We then need to add a CNAME record to our Domain Name Servers pointing towards the public URL of our Odoo web service.

    Conclusion

    In this tutorial, we deployed Odoo 17 to levv cloud with a single compose file.

    Here’s a recap of what we did to deploy your Odoo app :

    • Create a levv compose file to define a web service (Odoo) and a db service (PostgreSQL)
    • Create a persistent volume for the database service’s data
    • Expose our Odoo web service to the world using labels and custom domain names

    As you can see, deploying application on levv is very easy and secure by design.

    If you find this article helpful, or if you have any questions related to deploying your applications on levv cloud, feel free to drop me a line in the comments below!

    Want to know more about levv’s cloud? Check our article explaining why choose an eco-friendly cloud solution like levv?

  • Deploy your WordPress site easily on levv cloud

    Deploy your WordPress site easily on levv cloud

    WordPress is the world leading Content Management System (CMS), based on PHP and MySQL.

    In this tutorial, I will show you how to deploy your WordPress site on levv cloud, the lightweight and eco-responsible cloud platform. We will also deploy a persistent database for storing your content, using MySQL backed by a persistent volume.

    Let’s dive in!

    levv cloud storage

    Prerequisites to deploy your WordPress site

    Make sure you have the latest version of the levv CLI installed and available in your $PATH. You can download and install the levv CLI here.

    If you don’t have one already, you will need to create an account on levv cloud, and authenticate using the levv auth login command.

    You will also be prompted to create a default project, which we can use to deploy our WordPress application (ours is named "wordpress-project").

    Dockerizing WordPress

    Levv cloud services are based on containers, which are lightweight and portable units of software.

    At levv, we love Alpine Linux for our containers, as it is very light and easy to use. For this tutorial, we will use the official WordPress image running PHP 8.4 on Alpine Linux.

    Creating persistent storage

    By default, container data is lost after a crash or restart. To persist the WordPress database, we will create a persistent volume.

    Run the following command to create a volume of 2Gb inside your levv project.

    $ levv volumes create --size 2 wordpress-data

    Volumes can also be defined inside the compose file. If the specified volume does not exist yet, you will be prompted to create it.

    Deploying the application

    To deploy containers, our personal favorite is the compose format because of it’s simplicity and ease of use.

    Levv cloud uses a compose-compliant specification very similar to Docker Compose to define it’s components, so if you are familiar with Docker you should find your way around pretty quickly.

    Let’s create the following YAML file and save it as levv-wordpress.yaml.

    services:
      db:
        image: mysql:8.0
        environment:
          MYSQL_DATABASE: wordpress
          MYSQL_ROOT_PASSWORD: myR00tPassw0rd4567$$$
          MYSQL_USER: wordpress
          MYSQL_PASSWORD: wordpress
        labels:
          io.levv.size: "small"
        volumes:
          - wordpress-data:/var/lib/mysql
        ports:
          - 3306:3306  # Make db accessible to the wordpress service
      wordpress:
        image: wordpress:php8.4-fpm-alpine
        deploy:
          replicas: 1
        environment:
          WORDPRESS_DB_USER: wordpress
          WORDPRESS_DB_PASSWORD: wordpress
          WORDPRESS_DB_NAME: wordpress
        labels:
          io.levv.public: "true"    
        ports:
          - 80:8080
    
    volumes:
      wordpress-data:

    This is the simplest, albeit not secure, way to deploy WordPress, so do not use this example in production.

    Note: when using the ports key, there are two key differences compared to running your compose file on your local machine:

    1. By default, and for security reasons, services are not reachable by other services at all. If you want another service within the same service to access it, you need to define the ports key.
    2. Using the ports key does not make your service available to the outside world. You need to use a label for that, as explained in the section below.

    Next, we will deploy our compose file to levv cloud :

    $ levv apply -f levv-wordpress.yaml

    Once our services have been deployed, we will see the following output in the terminal:

    No project name has been specified, your default project will be used (wordpress-project).
    Getting project volumes    successful
    Applying specification    successful
    
    SERVICE    PROJECT  REPLICAS  SIZE  PUBLIC URL                                STATUS    
    db         test     1/1       small <none>                                    DEPLOYED  
    wordpress  test     1/1       nano  https://wordpress-test-c0a0.svc.levv.io   DEPLOYED  
    

    For more information about the levv compose specification, click here.

    Exposing your application to the internet

    By default, services deployed on levv cloud are not publicly accessible.

    To expose our WordPress site to the internet, we added the io.levv.public label to the wordpress service in the compose file. As you can notice, the wordpress service does have a public URL, while the db service does not.

    Our WordPress site will be served using HTTPS, using SSL certificates from Let’s Encrypt.

    Note: levv takes care of SSL termination. So even if you expose port 80 on the container, the service will be accessible on port 443 via it’s public URL.

    We can also link our service to a custom domain name, using the domainname attribute in the compose file.

    For example:

    service:
      wordpress:    
        labels:
          io.levv.public: "true"
        domainname: blog.mydomain.be

    We then need to add a CNAME record to our Domain Name Servers pointing towards the public URL of our WordPress service.

    Conclusion

    In this tutorial, we deployed a WordPress blog to levv cloud with a single compose file.

    Here’s a recap of what we did to deploy our WordPress site :

    • Create a levv compose file to define a WordPress service and a MySQL service
    • Create a persistent volume for the database service
    • Expose our WordPress service to the world using labels and custom domain names

    As you can see, deploying applications on levv is very easy and secure by design.

    If you find this article helpful, or if you have any questions related to deploying your applications on levv cloud, feel free to drop me a line in the comments below!

    Want to know more about levv’s cloud? Check our article explaining why choose an eco-friendly cloud solution like levv?

  • Why choose a sustainable cloud solution like levv?

    Why choose a sustainable cloud solution like levv?

    A cloud that’s light, sustainable, and stress-free

    What if your cloud solution could be both a technological revolution and an ally for the planet? At levv, we like things to be simple, efficient, and responsible. That’s why we designed a cloud that makes your life easier without weighing down the Earth. The result: an intuitive, sustainable, and high-performance infrastructure, built to meet both your technical and ethical needs.

    But let’s get concrete: why choose a sustainable cloud solution? And what makes levv unique? Spoiler: it all comes down to three pillars. Three ways to lighten your daily workload—and the load on our natural environment.

    cloud levv bringing lightness to tech

    1. Technically light: simplicity as the driver

    The cloud shouldn’t give you headaches. That’s why levv focuses on solutions that are both simple and powerful.

    Products designed for efficiency:

    • Containers: run your applications in an optimized environment, hassle-free.
    • Block storage: keep your critical data stored locally and reliably.
    • Object storage: share and manage your files with ease, fully S3-compatible.

    With levv, say goodbye to endless interfaces and hello to a smooth user experience. No need to decode a complex manual before you start building. You can finally focus on what matters most: your projects and your creativity.

    An interface built for developers’ needs

    We know developers love tools that just work. With levv, there’s no stress—everything is designed so you can get started right away with a sustainable cloud solution. Need to integrate an API? It’s quick and simple. Want to deploy a complex project? Our containers make it possible in just a few clicks, without the weight of traditional systems.

    Continuous innovation

    levv isn’t just another sustainable cloud solution—it’s a philosophy. We listen to our users to continuously improve our products. Regular updates, tools designed to grow with your needs… Our goal is clear: make your experience as smooth and enjoyable as possible.

    products levv

    2. Socially light: the stress-free sustainable cloud solution

    What if your infrastructure felt as comforting as a good coffee with friends?

    At levv, we don’t just reduce our carbon footprint. Our urban data centers reuse their heat to warm social housing in Brussels. Yes, you read that right: your data helps keep families warm.

    tasse de café

    A positive impact on society

    Imagine infrastructure that doesn’t just perform—it also serves a real social purpose. At levv, every decision is guided by a dual ambition: meeting our clients’ technological needs while creating value for the community. That’s what motivates us to keep pushing further.

    Security as a top priority

    Your data is hosted on European infrastructures fully compliant with GDPR. This means you benefit from a high level of protection, without compromise. By choosing levv, you ensure complete sovereignty over your data. No surprises, no stress.

    Transparency at every level

    When it comes to budget, we keep it simple: transparent pricing that’s up to 65% more affordable than the industry giants. And this isn’t about cutting corners—it’s about achieving optimal efficiency through a light, innovative infrastructure.

    3. Environmentally light: sustainability in action

    Reducing environmental impact is our mantra.

    An eco-responsible infrastructure

    Our data centers boast an exceptional PUE of 1.09, well below the European directive that sets a 1.2 target for new data centers by 2026. For context, the industry average PUE is 1.58, meaning most data centers consume far more energy to operate.

    Such a low PUE is often achieved at the cost of excessive water use or by building massive data centers with a heavy strain on the power grid. At levv, we’ve chosen another path: immersion cooling that cuts energy consumption by up to 80% while completely eliminating water usage. An approach that combines innovation, performance, and respect for the environment.

    Full transparency on carbon footprint

    With our real-time measurement tools, you always know the environmental impact of your applications. Every line of code you run on levv contributes to a circular, sustainable cloud. This transparency empowers you to make informed decisions to minimize your footprint.

    A first in the cloud industry

    Achieving a PUE of 1.09 while eliminating water usage entirely—and avoiding the need for mega data centers? That’s a first, and it’s something we’re proud of. Unlike traditional solutions that sacrifice precious resources to optimize energy efficiency, levv proves it’s possible to build a sustainable cloud solution that is high-performance, eco-friendly, and reliable—with no compromises.

    A long-term vision

    levv’s goal isn’t just to reduce its footprint in the short term, but to build a sustainable model for future generations. We embed energy efficiency and environmental responsibility directly into the solutions we develop. Every new technical advancement is designed to optimize resource use, lower energy consumption, and improve the durability of our infrastructure. That means using renewable energy, constantly refining our processes, and raising awareness among our clients about ecological challenges.

    clouds

    Choosing levv means choosing lightness!

    Opting for a sustainable cloud solution like levv is both a strategic and an ethical choice. Our three pillars—simple, stressless, sustainable—are redefining how technology can serve your business while respecting our natural environment.

    By choosing levv, you’re not just selecting a cloud solution. You’re joining a community committed to building a greener, more responsible future.

    So why not choose a lighter digital future—starting today?